Here’s a video of the construction process for the koi pond and waterfall we just finished.
Check back later for more photos and videos of the finished product.
Thanks
Jacob
Living Waters Landscaping
828-301-8017
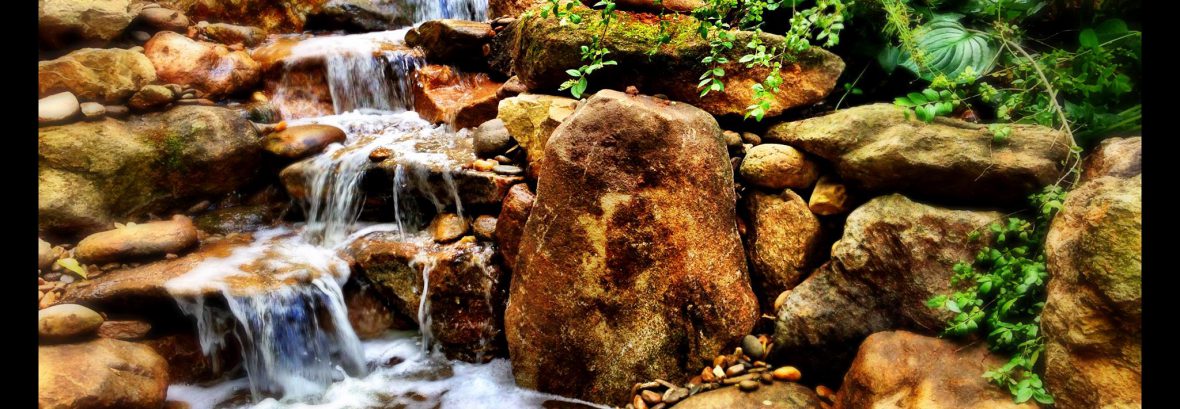
Custom Water Features and Gardens in Asheville, NC
Here’s a video of the construction process for the koi pond and waterfall we just finished.
Check back later for more photos and videos of the finished product.
Thanks
Jacob
Living Waters Landscaping
828-301-8017
This month we have been working on building a decorative garden pond in Hendersonville, Nc.
This project is currently under construction. Please check back later for finished project photos.
This pond will be appropriately 15×22 ft wide and 4 ft deep. We added some special features to this system. Including: an intake bay filter, a wetland filter and an airlift bottom filter.
With all these filters combined, along with aeration and circulation jets, the pond will be crystal clear and have very little maintenance to keep it that way.
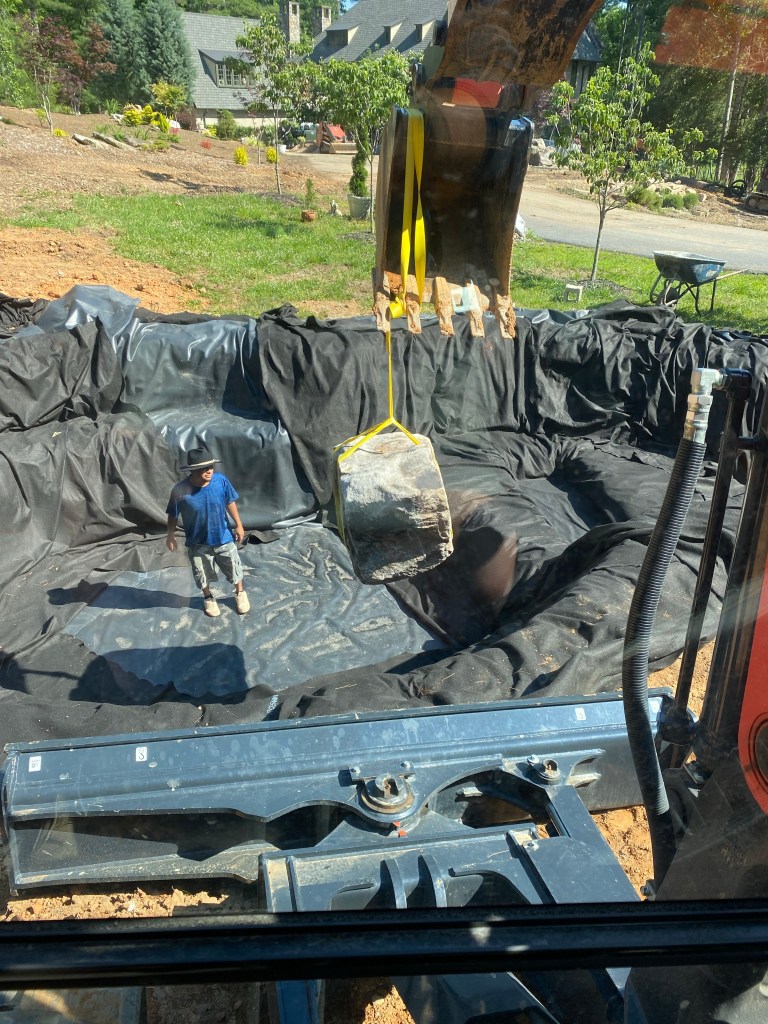
We started off by excavating the pond area and lining it with a 45 mil EPDM rubber liner. Then we set boulders along the pond wall, leaving planting pockets for aquatic plants that will help keep the water clear and healthy.
We added some large boulders into the pond to create a truly unique and impressive feature.
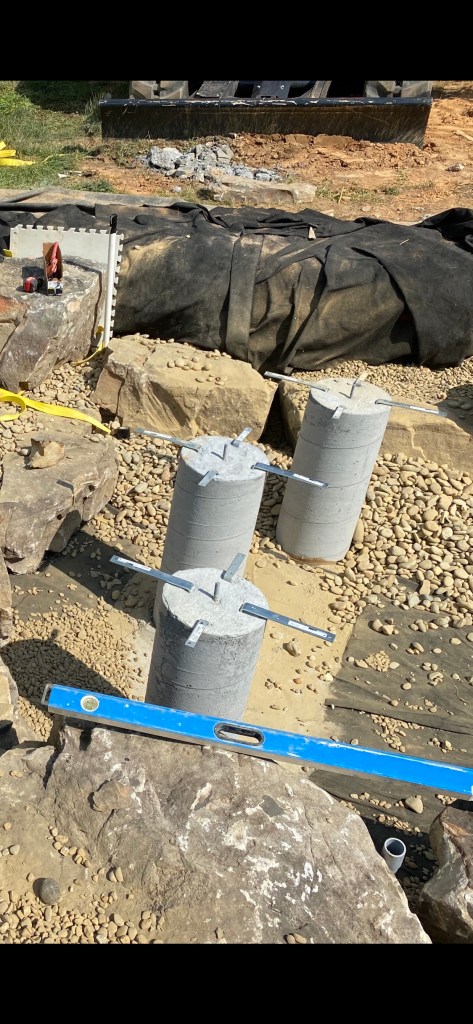
We also added a fun feature to this pond. Floating Steps! They are actually not ‘floating’ but will look like it when the pond is full. We set flagstone steppingstones on top of concrete pillars to create this awesome feature.
As this pond developed, we decided to add some aquatic lighting into the pond so our client could enjoy the fish at night.
One of the unique filtration options we installed into this pond was the airlift filter grid at the bottom of the pond. The airlift is created using a grid of perforated pipes under gravel laid into the bottom of the pond. When the system is on, the aerator will pump water into a vertical pipe connected to the grid and create a vacuum. This will draw water through the grid and discharge it to the top of the pond. Making the whole floor of the pond a big biological filter.
As we are still working on this system, please check back soon for some finished project photos and videos.
Give us a call or message with any questions, or if you are considering having a pond or waterfall installed in your yard.
Jacob
Living Waters Landscaping
828-301-8017
Here’s a video on building a large bubbling boulder fountain.
We completed this project in Asheville, NC
Boulder fountains are a great way to get the relaxing sound of a water feature into your yard with minimal space used.
This feature only takes up about a 5×5 ft area, so they’re great for small yards.
In this video we will detail the full construction and installation process, will all tools and materials that you will need.
Working in the landscape industry allows us to create beautiful features with lots of different types of materials. We are just finishing up this custom Pondless waterfall in Weaverville, NC.
This was a fun waterfall to build and was designed to flow out from under the new deck that we had built. Blending the new deck into the rock work and waterfall.
In order to do this we had to custom cut the stairs into one of our waterfall frame boulders.
At first it seemed like a problem. We didn’t plan to cut the step stringers into the boulder. But after we set the waterfall rocks, we realized the frame boulder was too tall. So we got together with the carpenter and came up with a solution. In the end I think it helped to meld the two features together.
We’ve had the opportunity to use wood, stone and even metal into some of our features. I really love to be able to blend the different materials when possible.
There are lots of options for your water feature projects. So think outside the box and be creative!
Also using ceramics and sculpture can be a fun way to create a water feature or fountain
Give us a call to help you dream up ideas for your next landscape or water feature project.
Jacob
Living Waters Landscaping
828-301-8017
Here is a quick guide to building a pondless or vanishing waterfall in your backyard or garden area. The Pondless waterfall is a great addition to any landscape design. Simple and low maintenance, yet guaranteed to be the focal point of your garden.
We will be detailing a Filtrific Vanishing waterfall in this post.
To read more about the difference between a Filtrific Vanishing Waterfall and the traditional Pondless Waterfall go Here.
As with any waterfall or landscape design, I always recommend doing a drawing or having a professional designer draw out a plan for your project area prior to construction of your water feature. This will allow you to plan for future planting or hardscaping and make sure you are satisfied with the location of the waterfall before construction begins.
The first step, after you have decided on the right location for your waterfall, (considering things like, the view from your house or seating area, and making sure the water flows from a naturalistic starting point.) would be to size your system.
Your system size is the total amount of water that will be circulating through the waterfall and any point.
Using the Filtrific sizing chart is a very useful tool, and will help you figure out how much space you will need to hold the total volume of water in your feature. This is a very important part of the project. You will need approx. 3 times the volume of water, flowing trough the waterfall or stream, in your holding tank or pondless basin. Do not under estimate this step! I have seen many projects gone wrong by not having enough volume of water to run the system.
The Filtrific system has two basic components. The first is the filter box and pump housing. This box will hold your leaf catch baskets, pump, overflow port and automatic fill valve (if you choose to use an auto-fill).
The second component is the expansion tank. This is only needed if your system has a greater volume then the filter box can hold. (See sizing chart).
Once your design, location and system size are set, you are ready for excavation.
Dig out an area to set your filter box, as well as, a rough excavation for the waterfalls and stream. Give yourself enough room in the waterfall excavation to account for placing boulders and stone. Always make sure your excavation is ‘cupped’ into your slope to give the feature a natural look.
Here you can see the installation of the Filtrific filter box as well as the expansion tank.
Make sure to set you box to the level of your finished grade for it to flow correctly.
Here is the box installed with the plumbing roughed in. You can see the overflow, pump discharge and auto-fill lines ready to be backfilled.
The best part of the Filtrific system is the fact that you can install the filter box in a remote location away from the bottom of the waterfall. This allows for easy access to the pump and can aide in the overall ascetic view of the feature.
Now that your box is placed and your excavation is roughed in, you can begin the construction of the waterfall. The first step is laying your liner out. Measure your length and width of the excavation area to be sure you have enough liner.
We used a 45 mil EPDM rubber liner with a 9 ounce Geo-textile fabric underlayment for this system.
Be sure there are no rocks or roots under the fabric that may puncture the liner.
Now you can start placing stone.
Starting at the bottom of the falls, set your stone and boulders on top of the liner, using extra caution not to damage the liner.
At each step, or fall, make sure you stop and backfill behind the liner to achieve maximum flow of water over the stone. You can use mortar or waterfall foam behind the stone to aid in this process.
Stone placement is a very artistic endeavor, it can be tedious, but is rather rewarding in the end.
Work you way up the falls until you reach your desired height. At the top of the falls you can choose to install a waterfall starter box or just run you pipe from the pump into the stream or falls.
After you are satisfied with the waterfall you can move back down to the bottom of the falls and install the fixed skimmer.
The fixed skimmer allows for a small pool of water to gather at the bottom of the feature while it is running. When the waterfall is turned off, the pool of water drains into the filter box, leaving no standing water in the feature. A real maintenance plus!
Now you are ready to install your pump and get your new waterfall flowing! Trim the edges of exposed liner, leaving approx. 8 inches around the edge to compensate for settling.
Using the Filtrific system when installing a vanishing or pondless waterfall will make the maintenance on your system much easier then the traditional
pondless waterfall system. Do some research on the different types of waterfall systems, or give us a call for a free consultation.
Thanks for reading this post and enjoy your new Vanishing Waterfall!!
JacobLiving Waters Landscaping828-301-8017